Odyssey™ Digital LED Headlight System
Odyssey™ Digital LED Headlight System
 Thank you for choosing the Odyssey™ Digital LED Headlight System. The SurgiTel® Odyssey™ Digital LED Headlight is a portable, battery-powered illumination device designed to provide high-intensity lighting for professional clinicians during medical, surgical, or dental procedures. Your SurgiTel® LED headlight has been designed to meet the demanding needs of today’s clinical professionals by allowing you to see, work, and feel your best.
Important: Before first use, please review all warnings, precautions, and safety information in the full Instructions for Use (IFU), available at the end of this guide.
Quick Start Guide
Intended Purpose
The SurgiTel® Odyssey™ Digital LED Headlight is intended for use by trained healthcare professionals to provide focused illumination during clinical and surgical procedures requiring enhanced visualization of anatomical structures. The device is suitable for use in controlled clinical environments such as operating rooms, dental clinics, or outpatient facilities.
Getting Started
The Odyssey™ Digital headlight can be attached to SurgiTel loupes or headband with a dove tail adapter or clip adapter, see the “Mounting to Loupe” section for instructions. To attach the Odyssey™ Digital headlight to non-SurgiTel loupes, optional mounting adapters are available. Batteries are shipped at a partial charge. Before first use, charge the battery to 100%.
Thank you for choosing the Odyssey™ Digital LED Headlight System. The SurgiTel® Odyssey™ Digital LED Headlight is a portable, battery-powered illumination device designed to provide high-intensity lighting for professional clinicians during medical, surgical, or dental procedures. Your SurgiTel® LED headlight has been designed to meet the demanding needs of today’s clinical professionals by allowing you to see, work, and feel your best.
Important: Before first use, please review all warnings, precautions, and safety information in the full Instructions for Use (IFU), available at the end of this guide.
Quick Start Guide
Intended Purpose
The SurgiTel® Odyssey™ Digital LED Headlight is intended for use by trained healthcare professionals to provide focused illumination during clinical and surgical procedures requiring enhanced visualization of anatomical structures. The device is suitable for use in controlled clinical environments such as operating rooms, dental clinics, or outpatient facilities.
Getting Started
The Odyssey™ Digital headlight can be attached to SurgiTel loupes or headband with a dove tail adapter or clip adapter, see the “Mounting to Loupe” section for instructions. To attach the Odyssey™ Digital headlight to non-SurgiTel loupes, optional mounting adapters are available. Batteries are shipped at a partial charge. Before first use, charge the battery to 100%.
Mounting to Loupe
Through-the-Lens Dove Tail Adapter: Slide the dove tail into the adapter from the top as shown in Figure 1.
Front-Lens-Mounted Clip Adapter: Slide the clip adapter onto the FLM rack housing until it clicks around the FLM pupillary distance (PD) knob (see Figure 2).
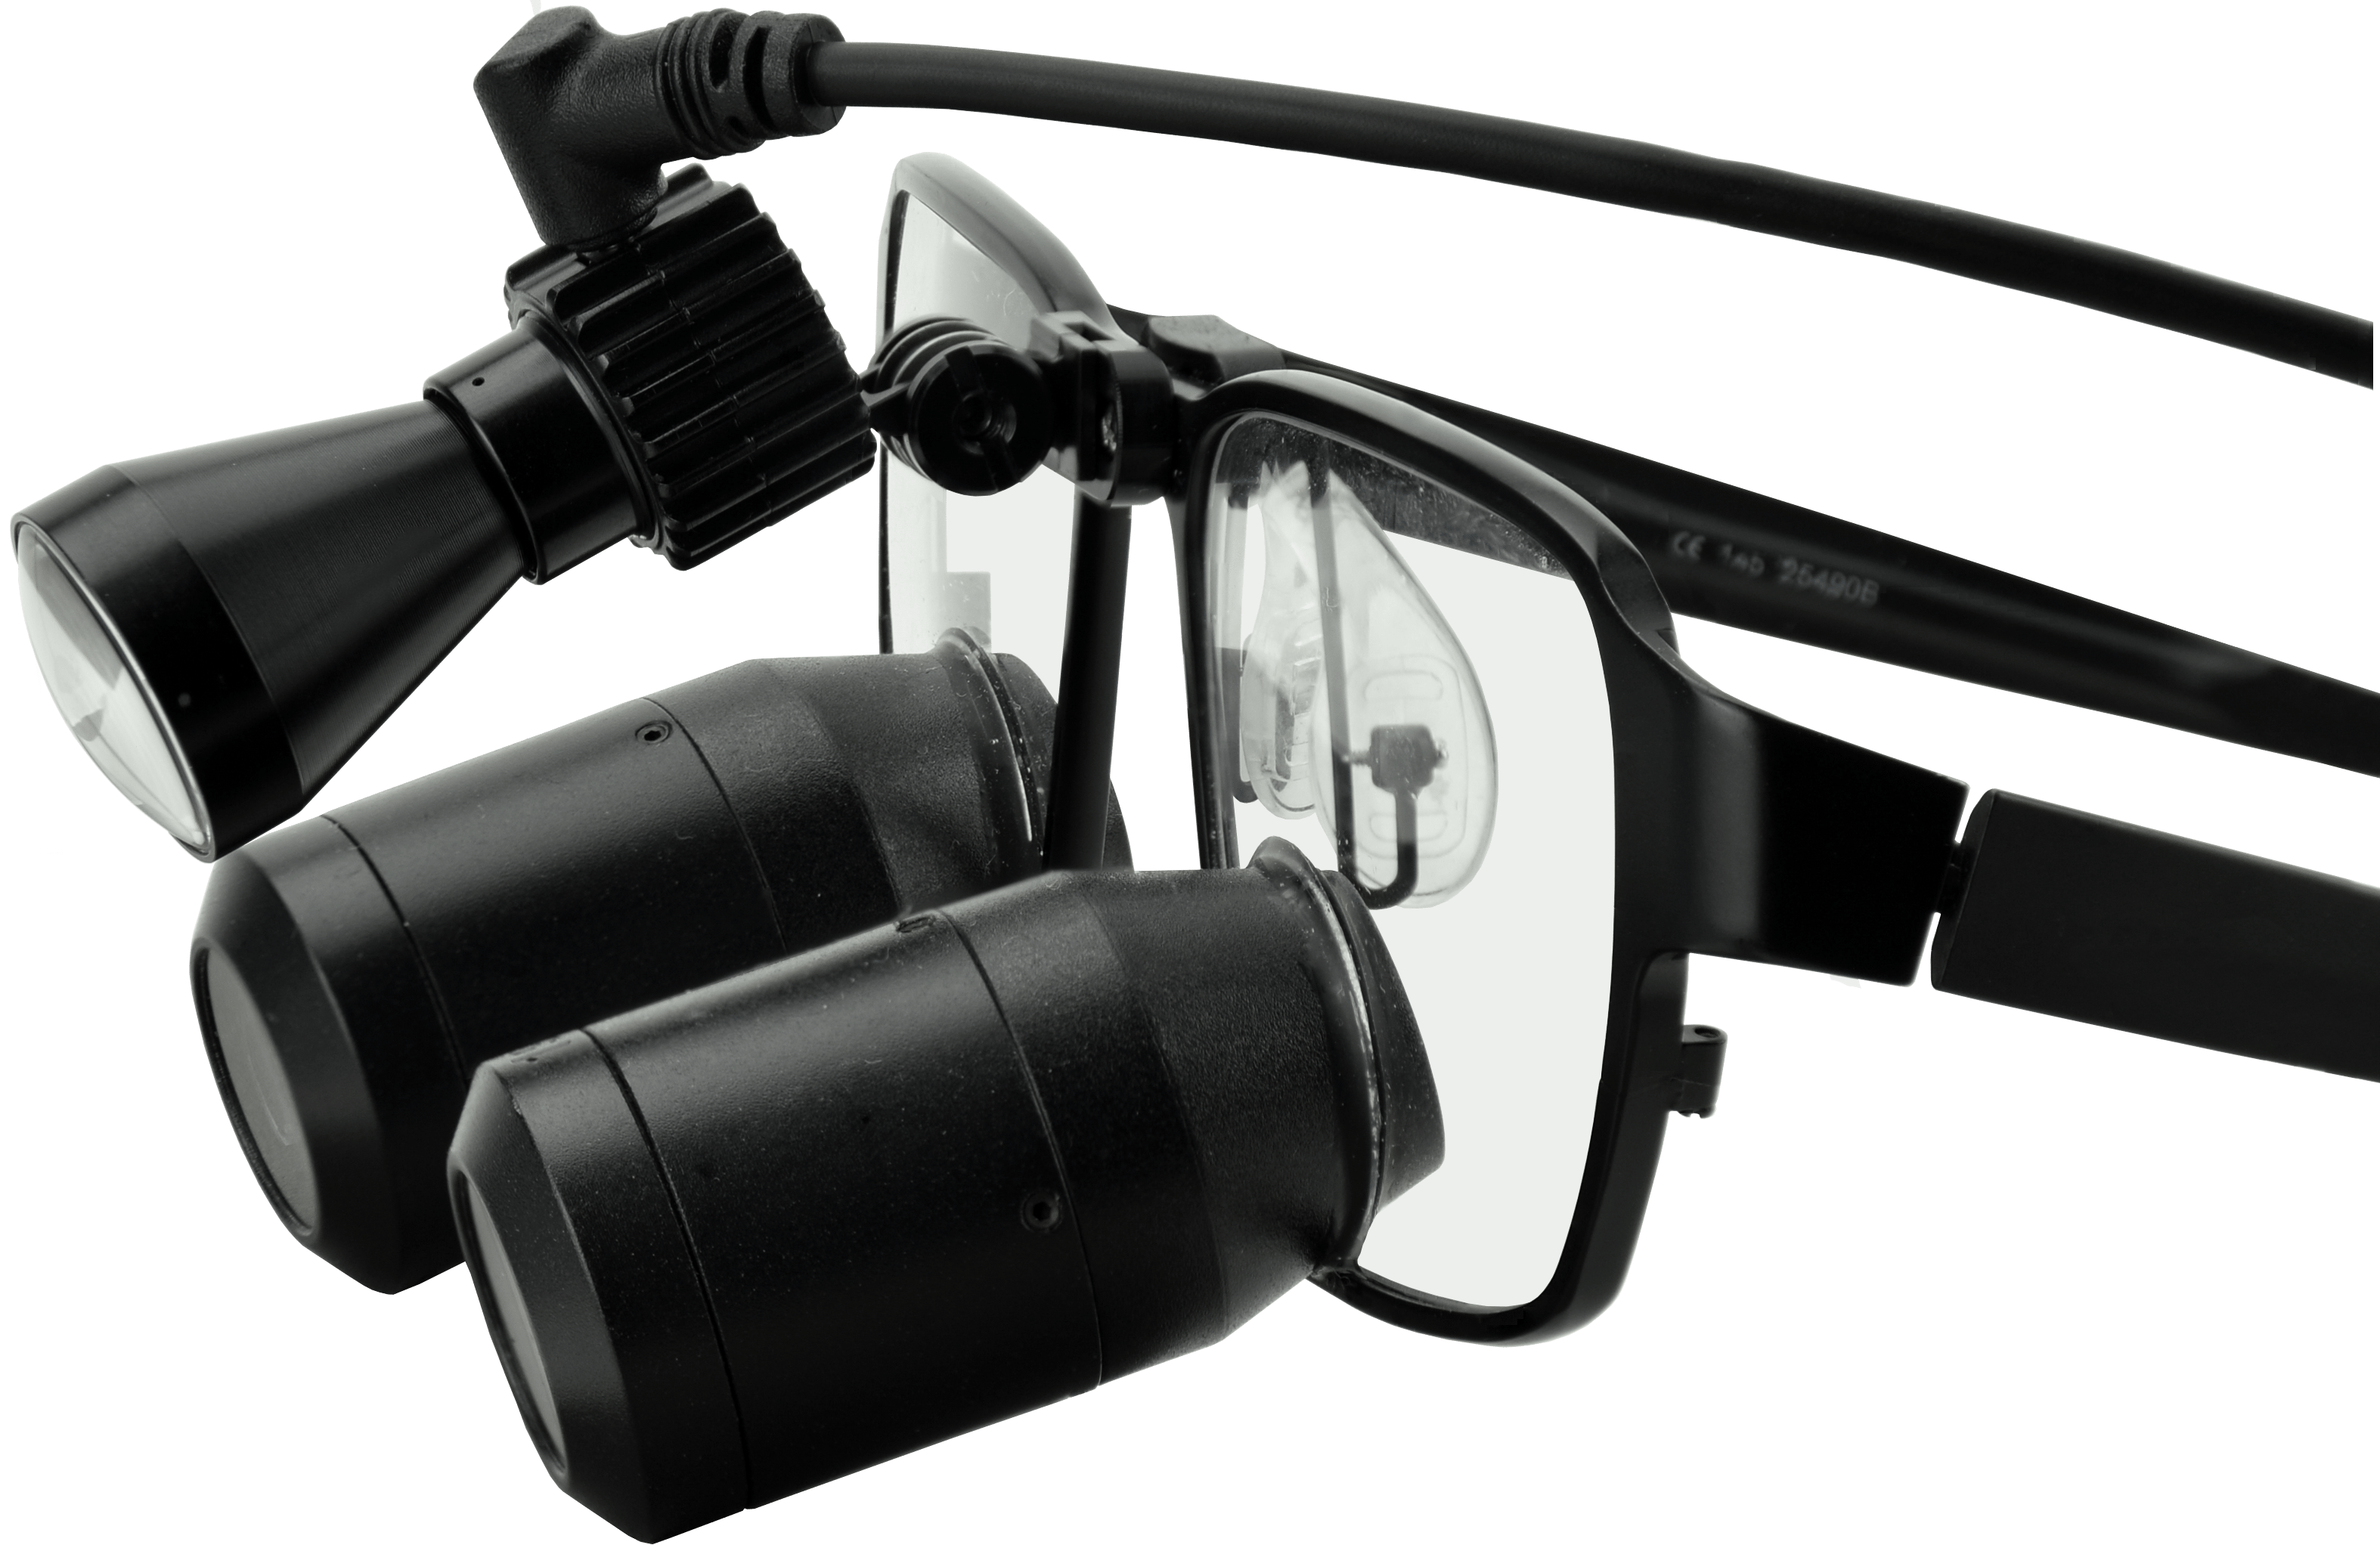
Figure 1: Through-the-Lens (TTL) dove tail adapter.
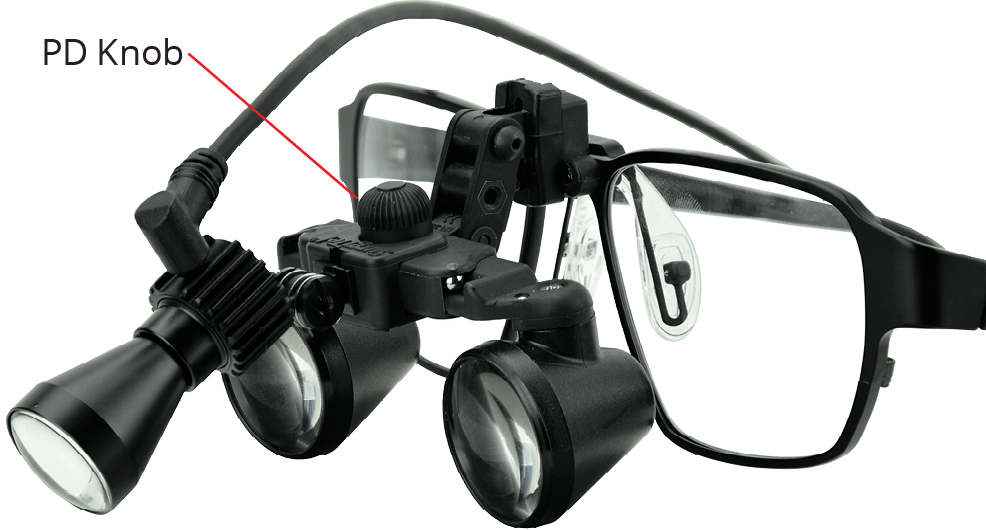
Figure 2: Front-Lens-Mounted (FLM) clip adapter.
Hinge Tension

Figure 3: Hinge set screw.
Your Odyssey™ Digital LED Headlight comes with the hinge set to optimal tension. However, the hinge may loosen over time. To adjust the hinge tension back to your preferred setting, follow the steps below.
Step 1: Use provided hex key to remove hinge set screw (see Figure 3).
Step 2: Use two flat-head screwdrivers (placed on each side) to loosen/tighten the special screw and nut. For a detailed instructions, watch the support video below.
Step 3: Once desired tension is met, reassemble and tighten the set screw.
Hinge Tension
Your Odyssey™ Digital LED Headlight comes with the hinge set to optimal tension. However, the hinge may loosen over time. To adjust the hinge tension back to your preferred setting, follow the steps below.
Step 1: Use provided hex key to remove hinge set screw (see Figure 3).
Step 2: Use two flat-head screwdrivers (placed on each side) to loosen/tighten the special screw and nut. For a detailed instructions, watch the support video below.
Step 3: Once desired tension is met, reassemble and tighten the set screw.
Figure 3: Hinge set screw.

Figure 4: Battery housing unit open.
Battery Cell Maintenance and Replacement
To maintain optimal battery health:
- Keep the charge above 50% (at least two battery indicator lights).
- Avoid fully draining the battery, as this may cause it to go dormant and make recharging difficult.
If the battery will not be used for longer than 3 months:
- Using a small Phillips screwdriver, remove the 4 screws holding the back panel at the corners.
- Remove the back panel off the battery housing.
- Carefully remove the battery cell from the housing and unclip the connector (see Figure 4). Store the cell in a cool, dry place.
- Once the cell is removed, reassemble the housing unit.
Battery Cell Replacement
SurgiTel battery packs are designed with easily replaceable cells, providing convenience, versatility, sustainability, and cost-effectiveness. Instead of replacing the entire battery pack, users can purchase and install replacement cells when the original degrades.
To replace the battery cell:
- Remove the screw caps and back panel screws with a Phillips screwdriver.
- Remove the used battery cell and insert the new one, clipping the cable securely into the board connector.
- Reattach the back panel and screw on the panel (do not overtighten).
- Fully charge the new battery before first use.
Figure 4: Battery housing unit open.

Figure 5: Power Button
Operating Your Odyssey™ Digital Headlight
- Power On / Off: Press and hold power button (Figure 5) 2 seconds to turn the light on or off.
- Light Intensity: Short press the power button to cycle through three brightness levels: Max, Medium, and Low. The unit will retain the last selected brightness level when powered off and back on.
- Battery Level: The three-step battery level indicator lights (see Figure 6) are located on top of the unit. Three lights indicate a 100% charge, two lights indicate 70%, one light indicates 30%, and the single light will blink when the battery level falls below 15%.
- Recharging: To recharge, connect the included USB Type-C charger to the USB Type-C port located on the bottom of the control unit (see Figure 7).
- Charging Indicator: The charging indicator light, located next to the charging port on the bottom of the unit, glows red while charging and turns green when charging is complete.
- Light-Cured Composites: When working with light-cured composites, set the light to a lower intensity and use an orange color filter (strongly recommended) to prevent premature hardening. (Figure 8)
- Maximum Continuous Operation: Up to 8 hours at max brightness.
Figure 5: Power Button

Figure 6: Battery Level

Figure 7: Charging Port

Figure 8: Orange Flip-Up Filter
Figure 6: Battery Level
Figure 7: Charging Port
Figure 8: Orange Flip-Up Filter
Figure 6: Battery Level
Figure 7: Charging Port
Figure 8: Orange Flip-Up Filter
Cable and Routing
Cable Routing: Slide O-rings onto the temple arm to secure the LED cord. (Figure 9)
Battery Pack Placement: Use the Odyssey Battery Control Pack belt clip correctly to avoid damage.
Use the included garment clips to route the cable appropriately. (Figure 10)
Ensure the LED extension cable connection is secure to prevent movement or detaching during use.

Figure 9: O-rings attaching the light cord to the frame.

Figure 10: Recommended method of routing the LED headlight cable.
Maintenance and Adjustments
Storing the LED system in a safe place will prolong the life of the unit. The following guidelines will help in sustaining the LED systems useful life:
- Keep the optical face on the light unit from touching hard surfaces which may cause scratches on the surface. Scratches on the surface will diminish the light quality.
- Inspect the LED system for damage (e.g., cuts or punctures on the light cord, scratches on the optical face). Do not use if damaged.
- Ensure the battery is charged and connections are secure before use.
Cleaning and Disinfecting
Your headlight is a precision optical instrument made from high-quality materials. To maintain the longevity and optimal performance of your Odyssey™ Digital headlight, please follow these instructions for proper cleaning and disinfecting. Noncompliant cleaning and disinfecting methods may result in damage to the headlight and may void the warranty.
Cleaning
- Wipe down with a damp cloth using room-temperature water.
- Do not immerse in water or any liquid.
- Avoid using running water or disinfectant sprays near open slots on the light unit.
Disinfecting
- Clean the LED headlight before disinfecting. Ensure the disinfecting cloth is thoroughly wrung out to remove excess moisture. After disinfecting, make sure the LED headlight is completely dried. For an up to date list of recommended products, visit www.surgitel.com/help.
- Do not use any disinfectants containing alcohol, hydrogen peroxide, ethanol, ammonia, glutaraldehyde, iodophors, bleach, acid, phenol, or acetone that have not been approved for use by SurgiTel.
- Do not use an autoclave.
Professional Loupe and LED Headlight Tune Up with Detailed Cleaning
To keep your loupes and LED headlight working like new, we recommend a tune up at least once a year. This will ensure that your loupes are kept in great condition. To learn more about the U.S. and Canada Tune Up Program, visit www.surgitel.com/loupe-tune-up. For International customers, please contact your distributor for details.
Instructions for Use (IFU)
For full instructions, including warnings, precautions, troubleshooting, technical data, adverse events, and disposal/recycling information, refer to the official Instructions for Use (IFU):

