 Thank you for choosing the Voice-Activated Light (VAL™) Digital LED Headlight System. Designed to meet the demanding needs of today’s clinical professionals, this LED Headlight System will enable you to see, work, and feel your best.
User Manual (IFU)
Quick Start Guide
Indications for Use
The VAL headlight is an illumination device designed to be worn as a visual aid, specifically for illuminating operating areas and enhancing the visibility of anatomical features. It is intended solely for use by qualified professionals.
Precautions
- The headlight must be used only for the intended purpose described.
- Do not use the headlight if any component is damaged, loose, detached, or missing. This includes light optic, cable, and battery casing. Parts that are broken, missing, or worn should be replaced promptly. If such a repair or replacement becomes necessary, SURGITEL OR AN AUTHORIZED SERVICE DEALER SHOULD PERFORM ALL REPAIRS TO THIS PRODUCT.
- Do not aim the headlight directly at your eyes or at others around you.
Getting Started
The VAL headlight can be attached to SurgiTel loupes or headband with a dove tail adapter or clip adapter, see the “Mounting to Loupe” section for instructions. To attach the VAL headlight to non-SurgiTel loupes, optional mounting adapters are available. Batteries are shipped at a partial charge. Before first use, charge the battery to 100%.
Maintenance and Adjustments
Storing the LED system in a safe place will prolong the life of the unit. The following guidelines will help in sustaining the LED systems useful life:
- Keep the optical face on the light unit from touching hard surfaces which may cause scratches on the surface. Scratches on the surface will diminish the light quality.
- If cuts or punctures are visible on the system’s light cord, the LED system is no longer safe to use; it should be taken out of service immediately.
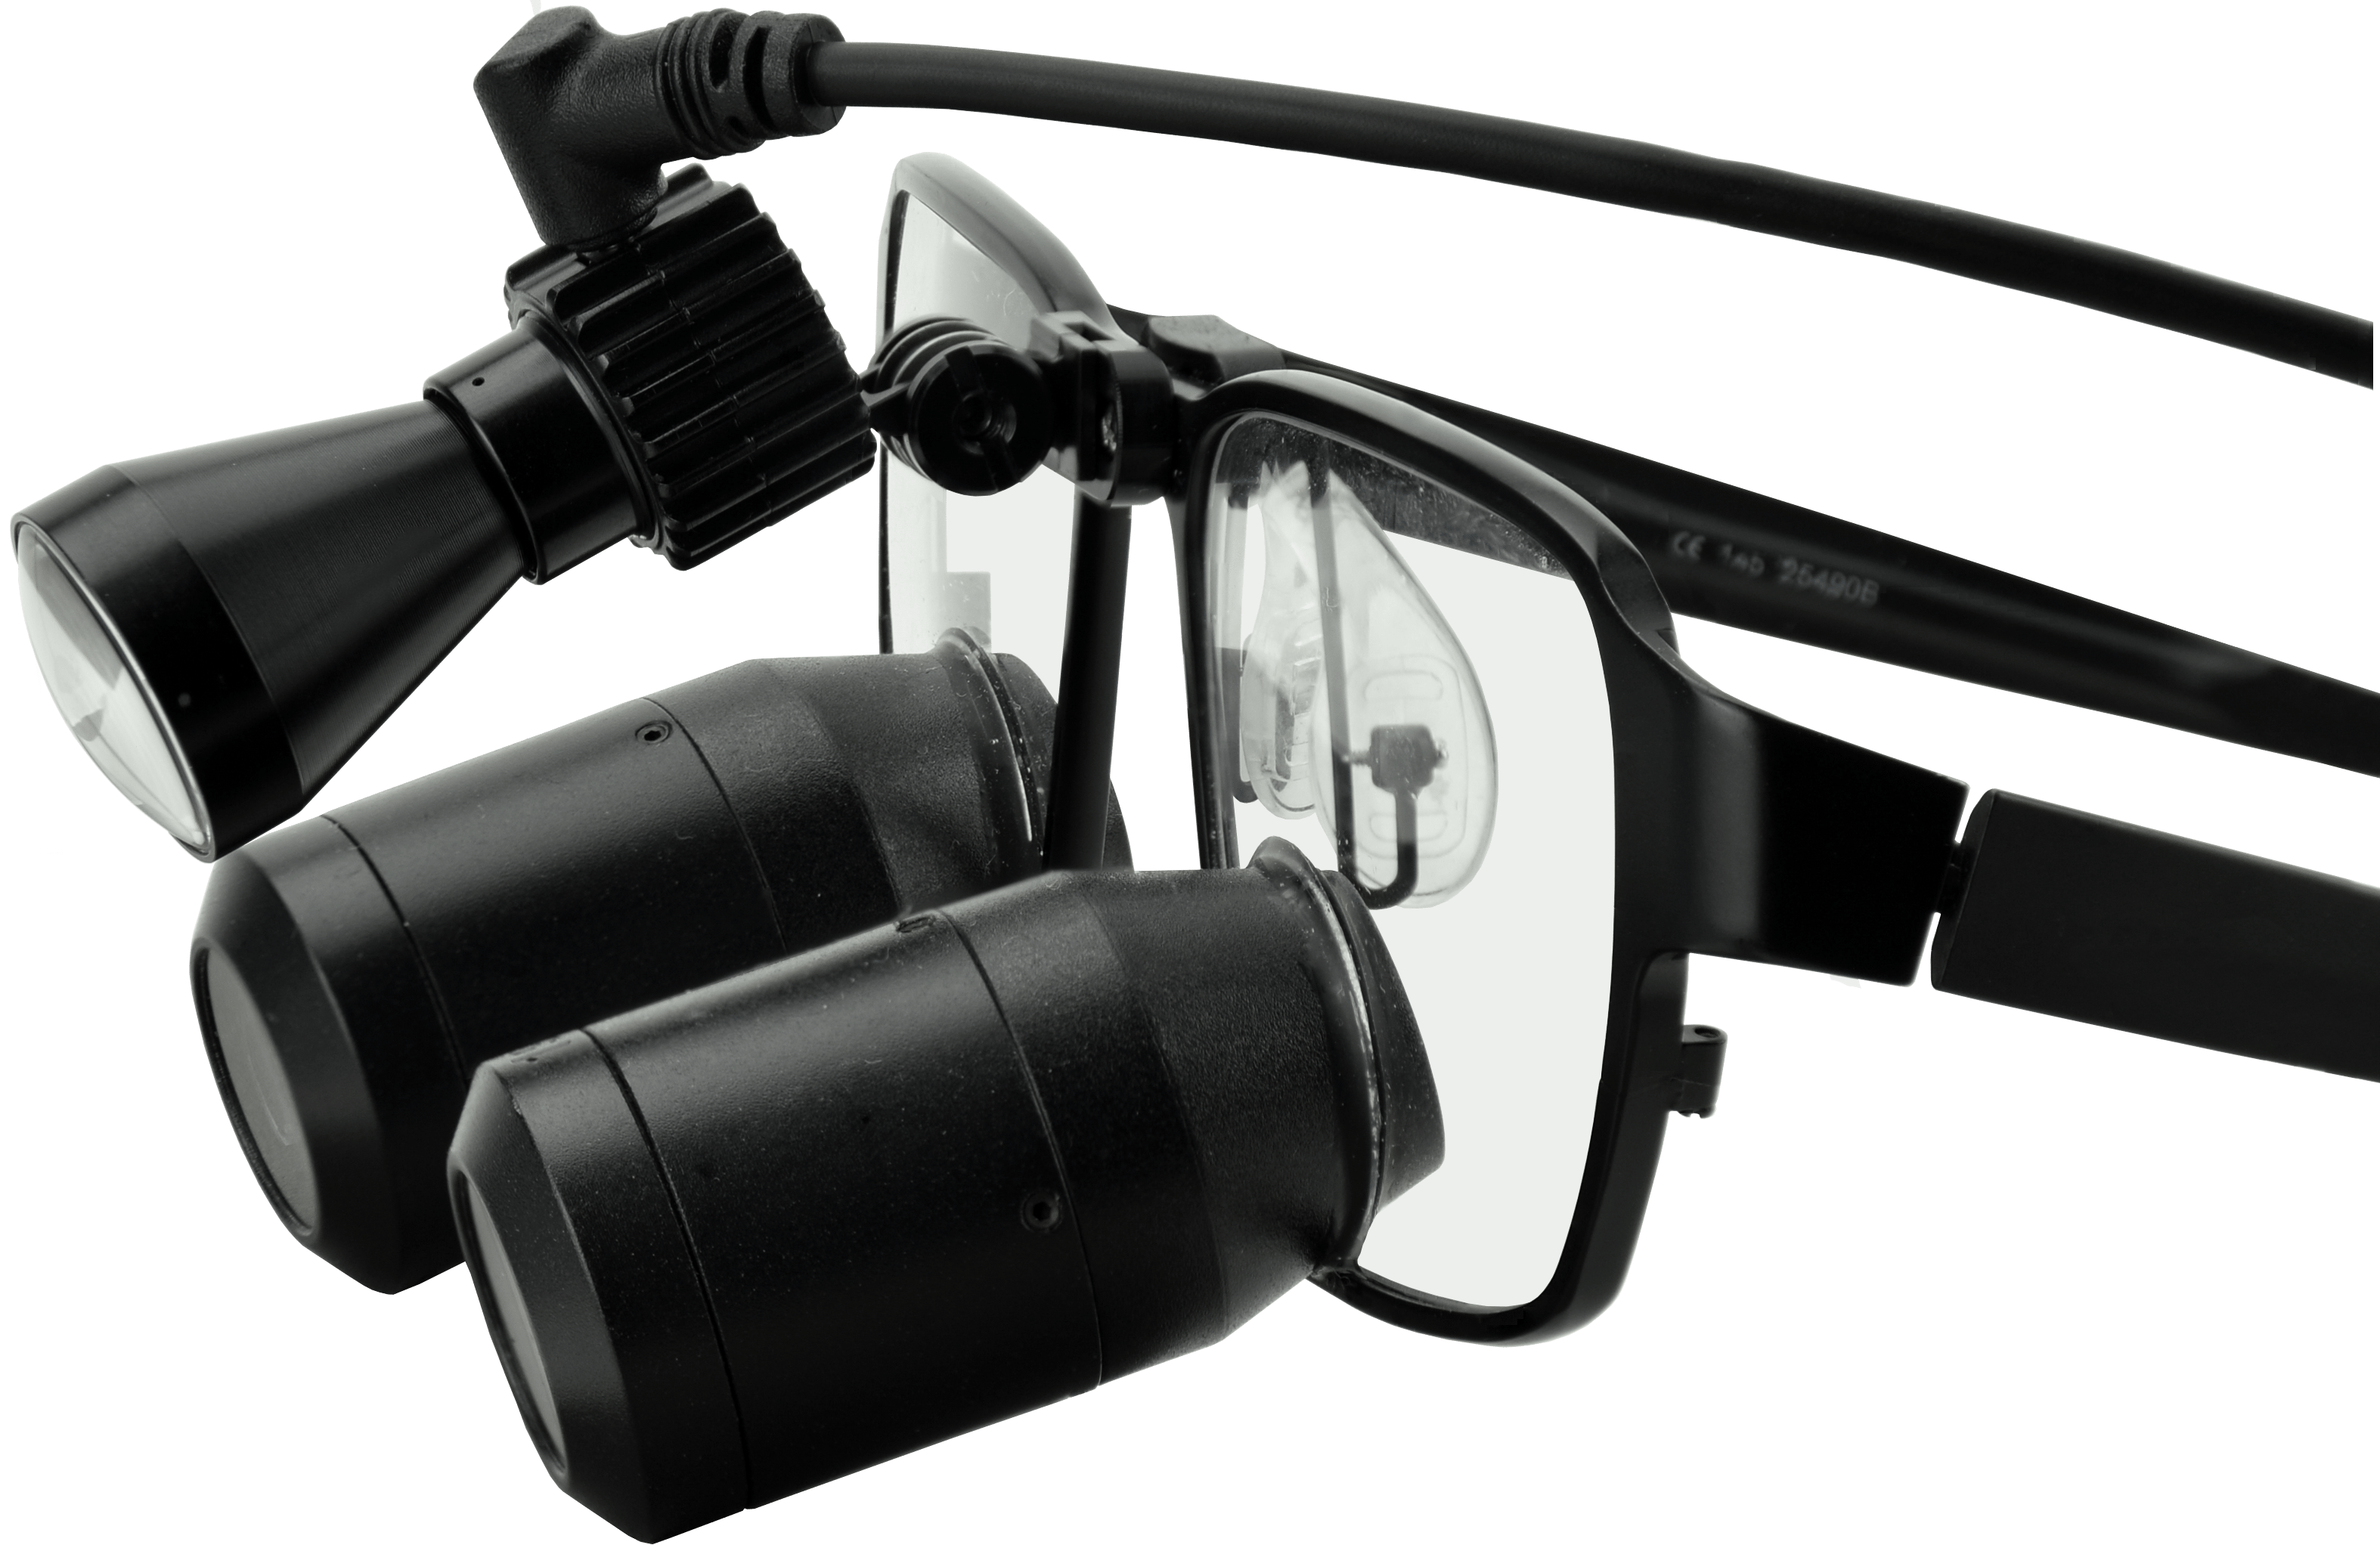
Figure 1: Through-the-Lens (TTL) dove tail adapter.
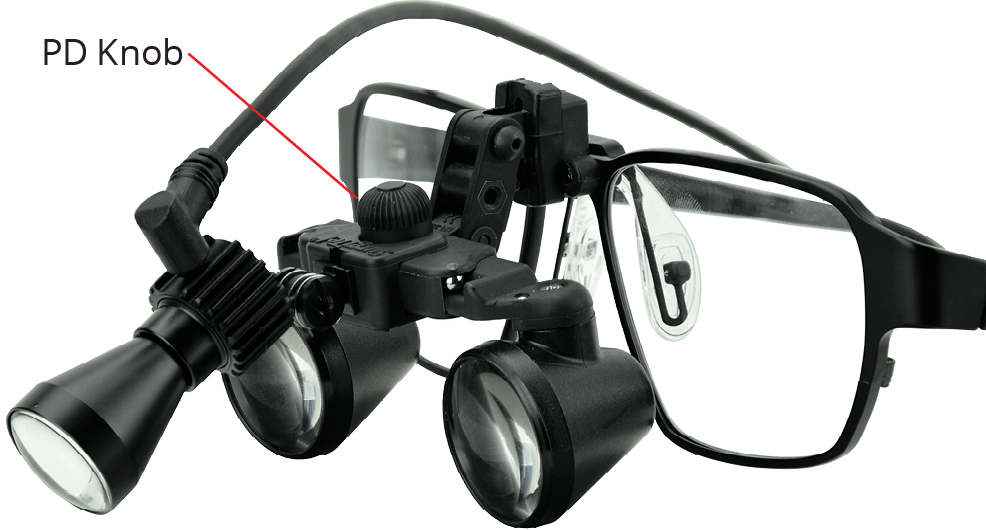
Figure 2: Front-Lens-Mounted (FLM) clip adapter.
Mounting to Loupe
Through-the-Lens Dove Tail Adapter
Slide the dove tail into the adapter from the top as shown in Figure 1.
Front-Lens-Mounted Clip Adapter
Slide the clip adapter onto the FLM rack housing until it clicks around the FLM pupillary distance (PD) knob (see Figure 2).
Hinge Tension

Figure 3: Hinge set screw.
Your VAL LED Headlight comes with the hinge set to optimal tension. However, the hinge may loosen over time. To adjust the hinge tension back to your preferred setting, follow the steps below.
Step 1: Use provided hex key to remove hinge set screw (see Figure 3).
Step 2: Use two flat-head screwdrivers (placed on each side) to loosen/tighten the special screw and nut. For a detailed instructions, watch the support video below.
Step 3: Once desired tension is met, reassemble and tighten the set screw.
Battery Cell Maintenance
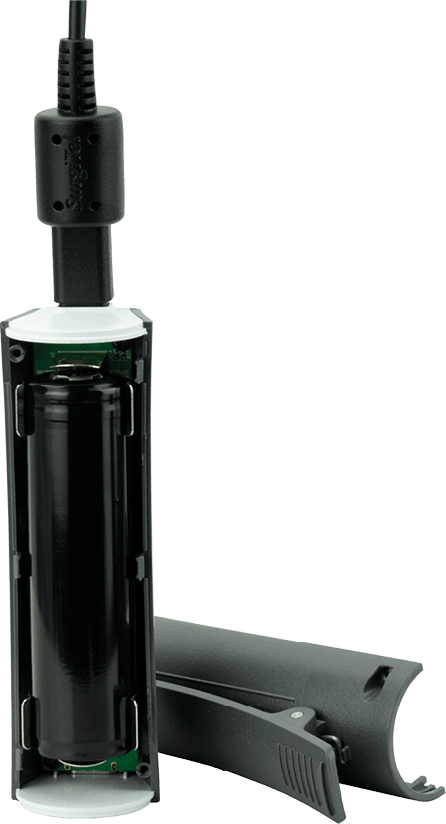
Figure 4: Battery housing unit open.
To maintain optimal battery health, it is advised to keep the battery charged above 50%, or two battery indicator lights. Avoid letting the battery fully drain, as this can cause it to go dormant. A dormant battery may become difficult to recharge.
If the battery will not be used for longer than 3 months, it is recommended to remove the battery cell from the housing unit (Figure 4). To properly remove the battery cell please follow the steps below.
Step 1: Remove the screw caps and set them aside. Use a small Phillips screwdriver to remove the screws.
Step 2: Remove the backing of the battery housing.
Step 3: Carefully remove the battery cell from the battery housing unit. Store the battery cell in a cool dry place.
Step 4: Once the battery cell is removed reassemble the battery housing unit.
Battery Cell Replacement
The cells in SurgiTel’s battery packs are easily replaceable, providing our customers with various advantages including convenience, versatility, sustainability, and cost-effectiveness. Users can purchase replacement cells as needed rather than investing in an entirely new LED battery unit when the original cell degrades.
Step 1: Remove screw caps and remove screws off back panel with a Phillips screwdriver.
Step 2: Remove used battery cell and replace with new cell.
Step 3: Reattach the back cover, screw it back together, and then replace the screw caps.
Step 4: Charge new battery to full power before first use.
Operating Your VAL Headlight
Charging and Battery Level Indicator Lights
- Use the included USB-C charger for fast charging. (Figure 5)
- Charge time is approximately 3 hours.
- While charging, the light will automatically turn off and light indicators will light up sequentially.
- When battery power drops below 20% the first indicator light will blink and battery pack will buzz every 5 minutes.
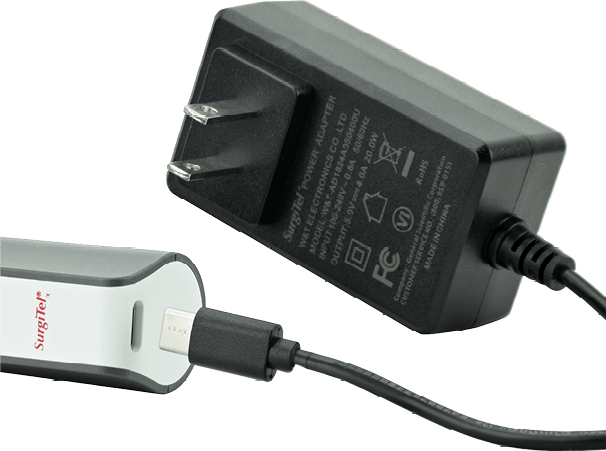
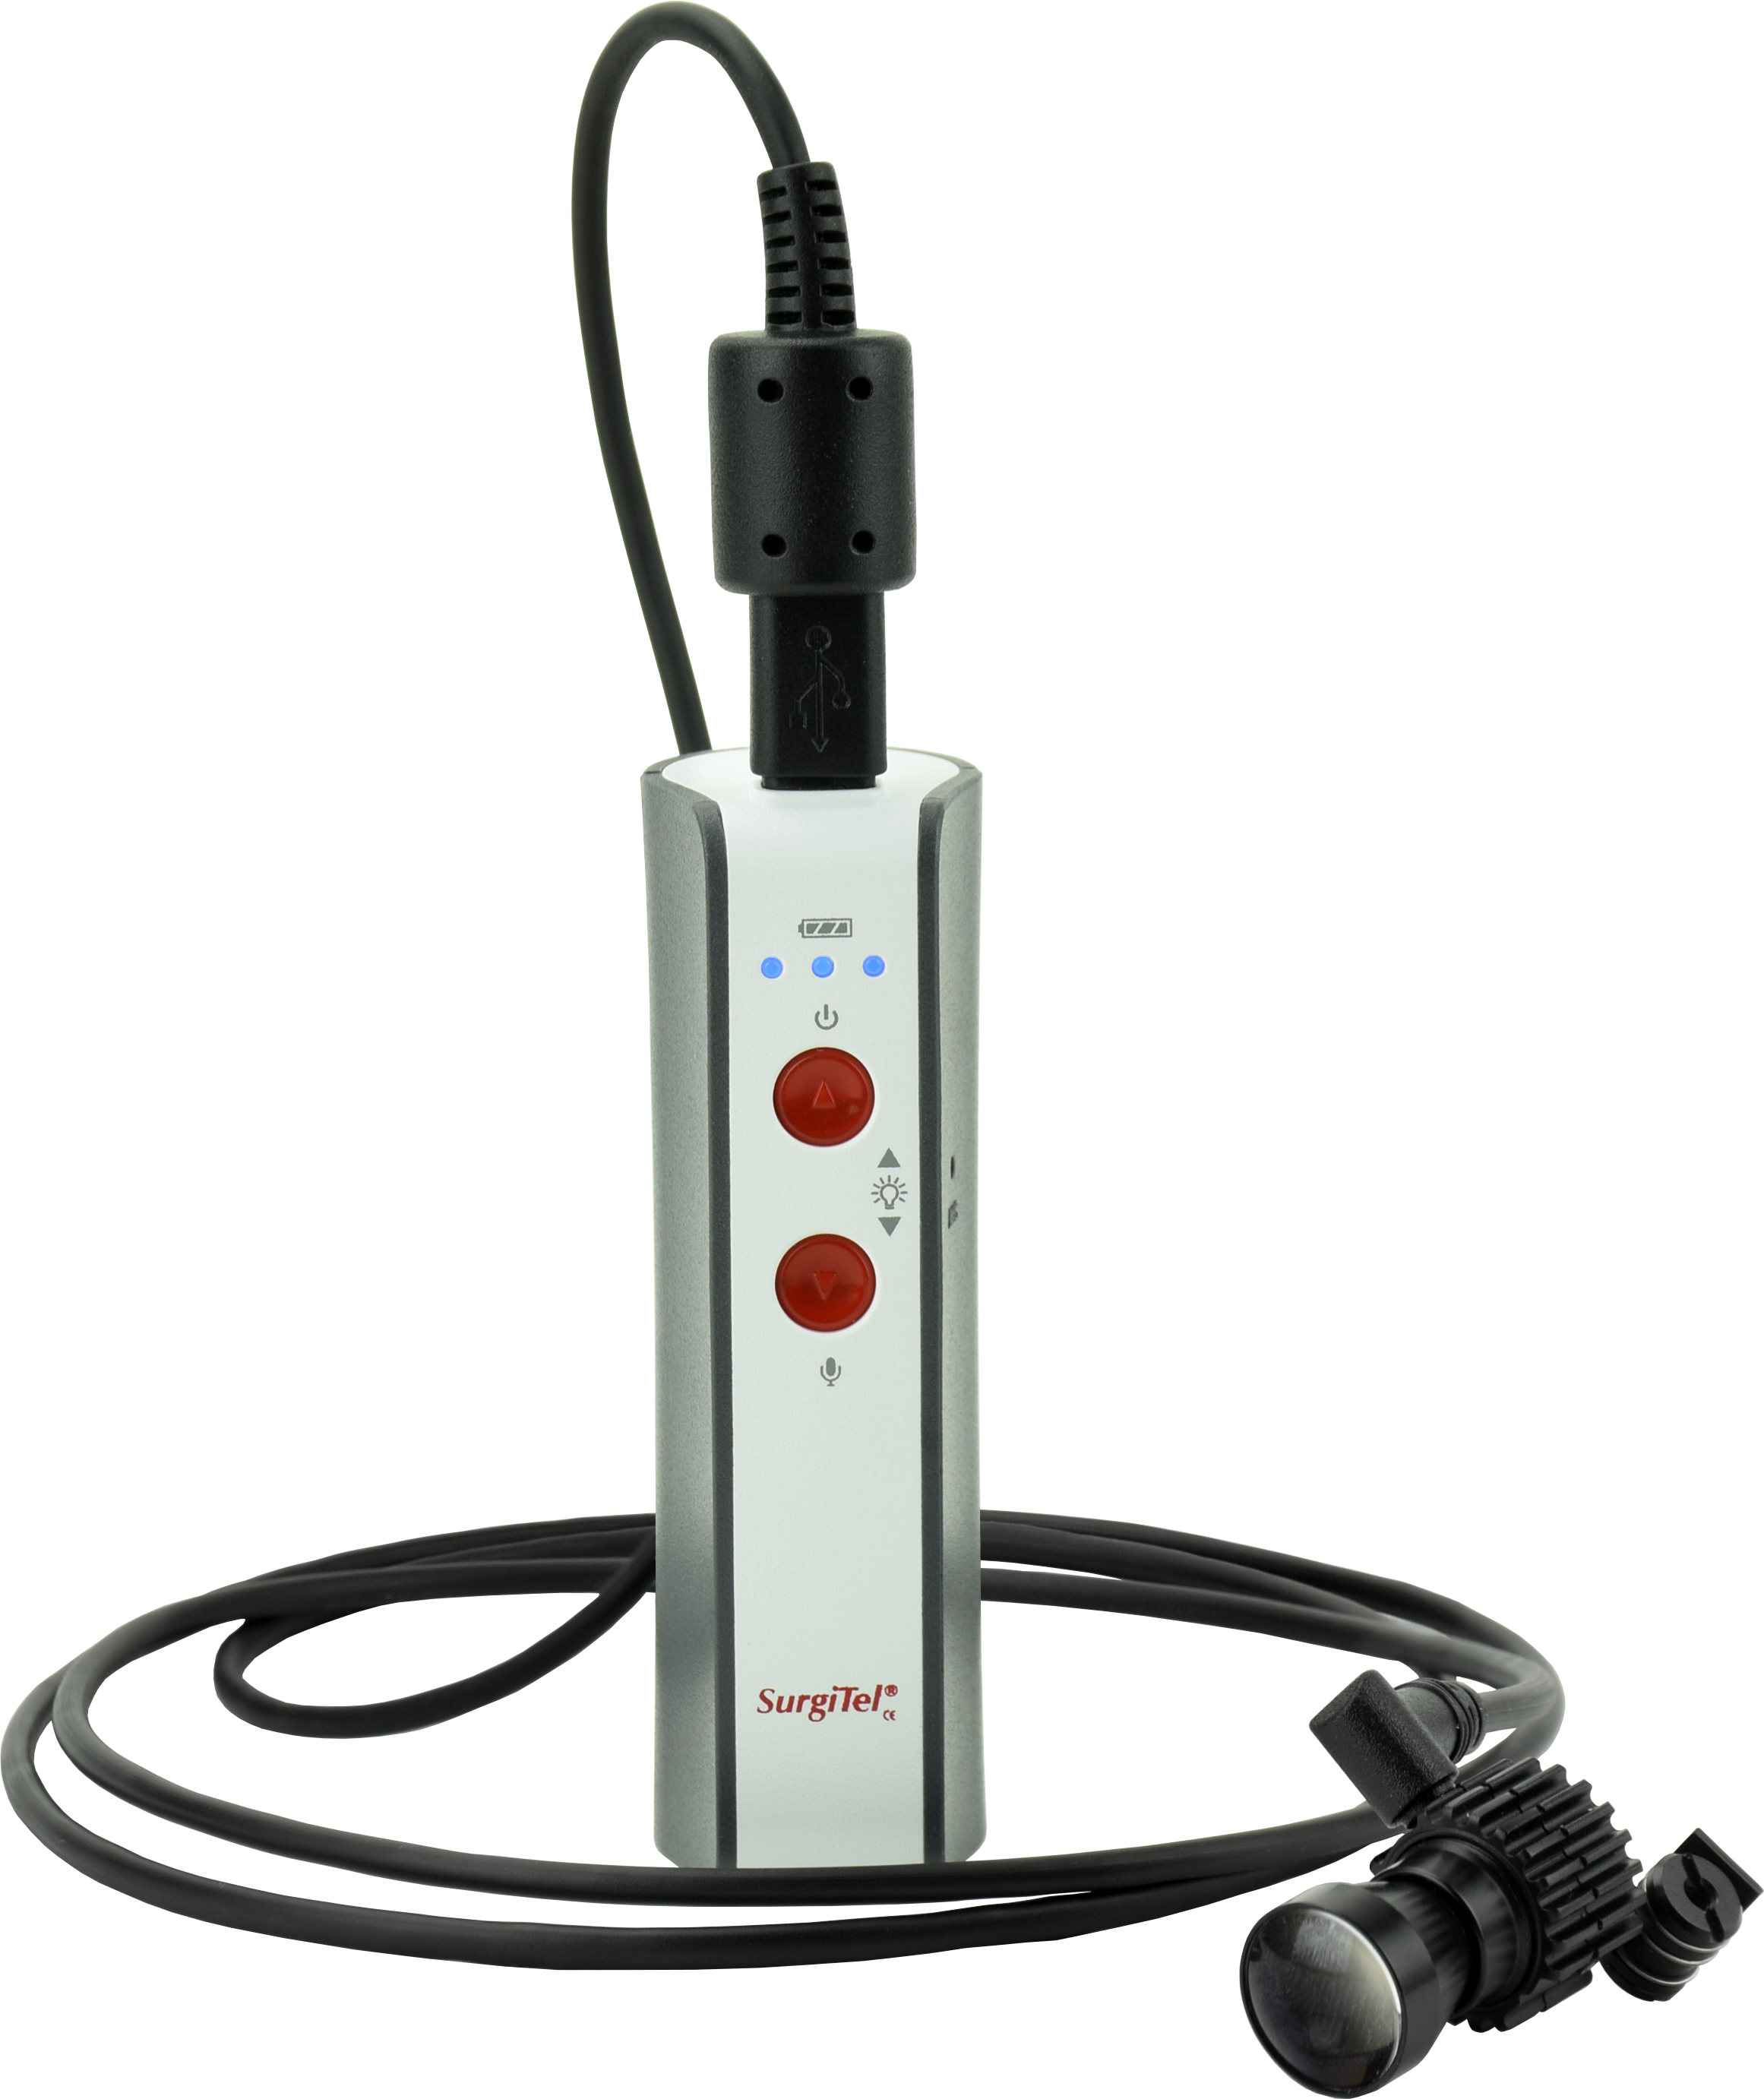
Figure 5: VAL Digital LED Headlight System battery with charger.
Battery Pack Controls and Voice Operation

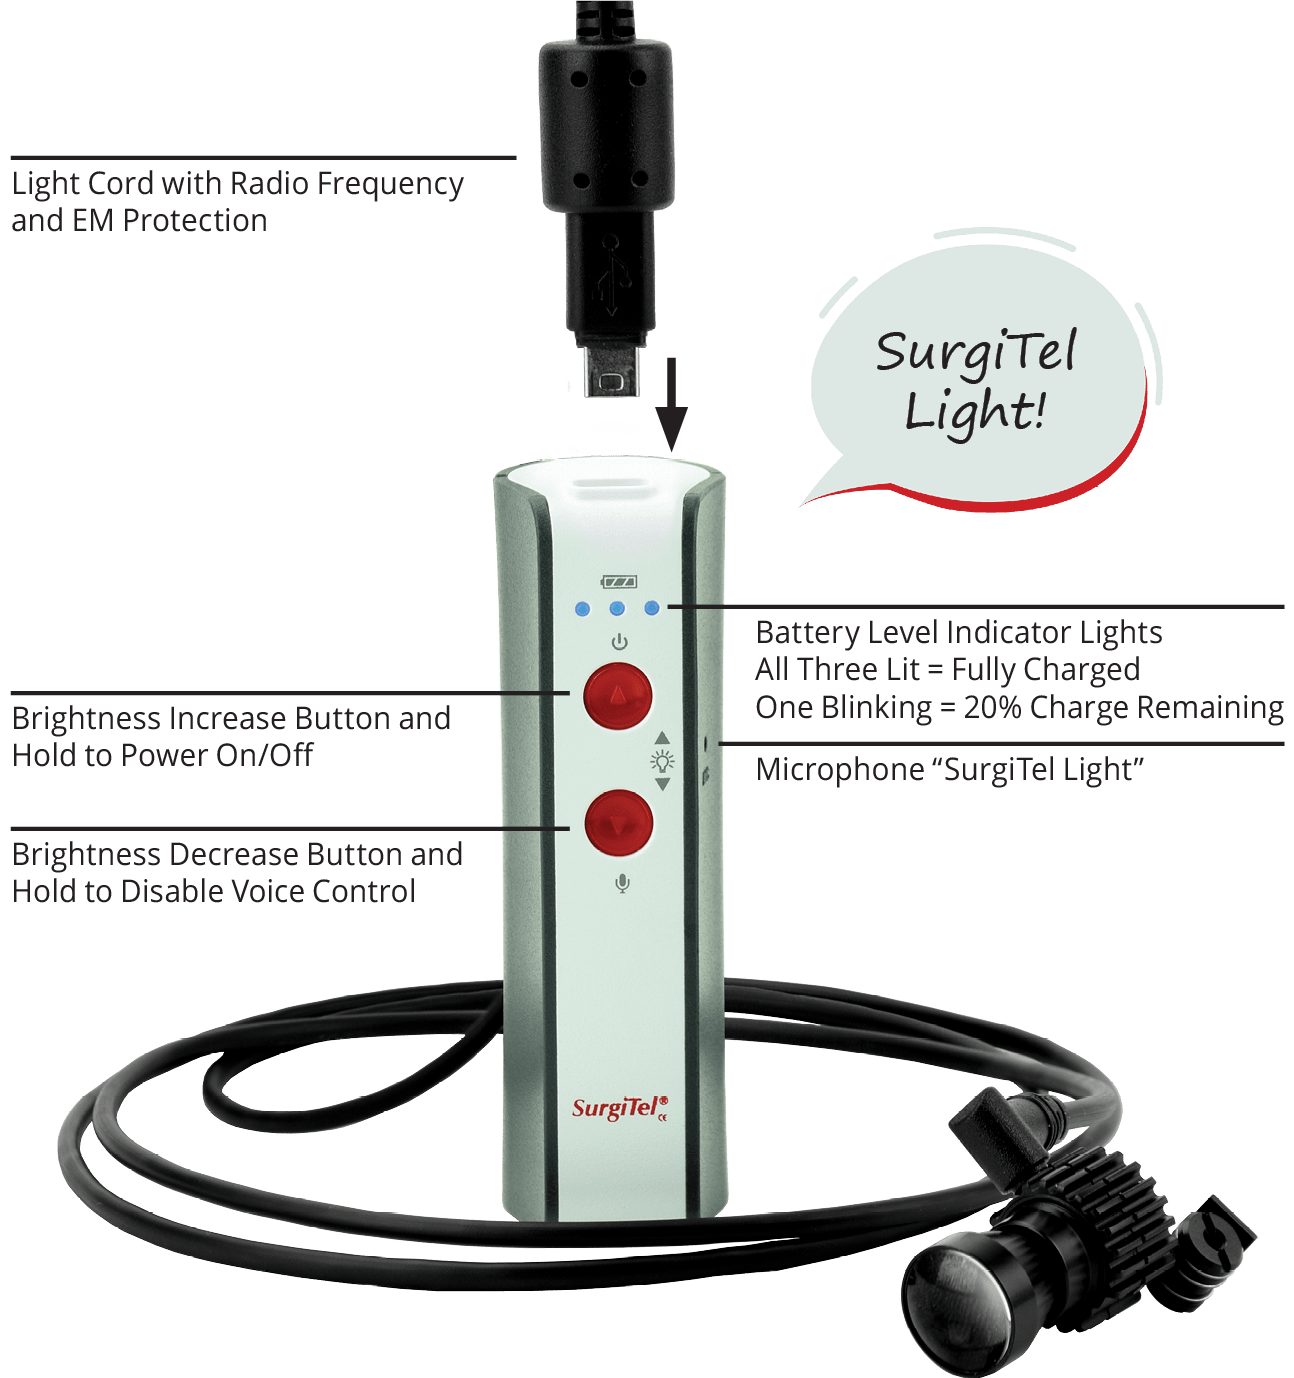
Figure 6: Close-up of the battery unit with the button controls and battery indicator lights.
To operate your device efficiently, follow these instructions for controlling the light and microphone settings. See Figure 6 for a close-up view of the battery unit, highlighting the button controls and battery indicator lights for easy reference.
- Press and hold the top button to activate the light. Note that the charger must be unplugged.
- To deactivate the microphone, press and hold the bottom button until there is a buzz chime. To reactivate the microphone, repeat the same process.
- To increase the brightness, press the top button. When you press the button to adjust the brightness, a short beep sound is emitted.
- To decrease the brightness, press the bottom button. When you press the button to adjust the brightness, a short beep sound is emitted.
- The light has 4 brightness levels: 100%, 60%, 40%, 0%.
- Once the light is turned on and the microphone is enabled, saying “SurgiTel Light” will turn the LED light on and off. (See Figure 7 for microphone location)
- If the light is left off for 1 minute, the battery unit will automatically power down completely.
Charging and Battery Level Indicator Lights
- Use the included USB-C charger for fast charging. (Figure 5)
- Charge time is approximately 3 hours.
- While charging, the light will automatically turn off and light indicators will light up sequentially.
- When battery power drops below 20% the first indicator light will blink and battery pack will buzz every 5 minutes.
Figure 5: VAL Digital LED Headlight System battery with charger.
Battery Pack Controls and Voice Operation
Figure 6: Close-up of the battery unit with the button controls and battery indicator lights.
To operate your device efficiently, follow these instructions for controlling the light and microphone settings. See Figure 6 for a close-up view of the battery unit, highlighting the button controls and battery indicator lights for easy reference.
- Press and hold the top button to activate the light. Note that the charger must be unplugged.
- To deactivate the microphone, press and hold the bottom button until there is a buzz chime. To reactivate the microphone, repeat the same process.
- To increase the brightness, press the top button. When you press the button to adjust the brightness, a short beep sound is emitted.
- To decrease the brightness, press the bottom button. When you press the button to adjust the brightness, a short beep sound is emitted.
- The light has 4 brightness levels: 100%, 60%, 40%, 0%.
- Once the light is turned on and the microphone is enabled, saying “SurgiTel Light” will turn the LED light on and off. (See Figure 7 for microphone location)
- If the light is left off for 1 minute, the battery unit will automatically power down completely.
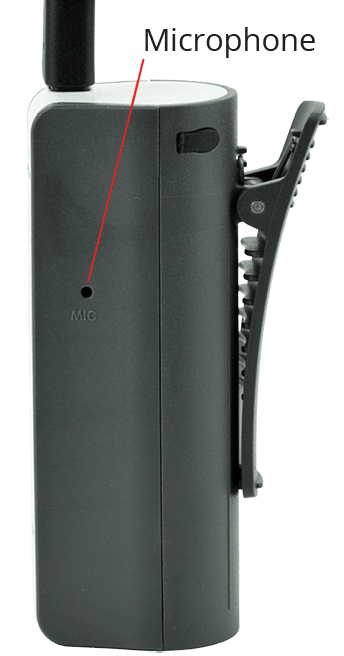
Figure 7: Side view of battery pack showing microphone placement.
Cable and Routing

Figure 8: O-rings attaching the light cord to the frame.
Two cables are available, a short 55cm and a long 125cm cable. Note that the long cable has a built in Radio Frequency and Electromagnetic Interference filter.
Attach the light cord to the frame by sliding both O-rings onto the temple arm, as shown in Figure 8. For the recommended method of routing the cable, refer to Figure 9.

Figure 9: Recommended method of routing the LED headlight cable.
Curing Filter

Figure 10: Curing filter flipped up.
When working with light-cured composites, it’s important to use the curing filter. Unfiltered light from the headlight can cause the composite to cure prematurely. The curing filter consists of two parts: a black bezel ring that attaches to the end of the headlight optic, and an orange filter that can be flipped up or down as needed during procedures (Figure 10). If the curing filter isn’t needed for your procedures, it can be removed from the headlight.
To remove the curing filter, use a screwdriver to loosen the screw on the curing filter ring until it can easily slide off. Be sure that you do not completely remove the screw.
Cleaning and Disinfecting
Your headlight is a precision optical instrument made from high-quality materials. To maintain the longevity and optimal performance of your VAL headlight, please follow these instructions for proper cleaning and disinfecting. Noncompliant cleaning and disinfecting methods may result in damage to the headlight and may void the warranty.
Cleaning
- To clean your SurgiTel LED headlight, wipe down with a damp cloth using room-temperature water, avoiding the open slots located on the light unit.
- Dry thoroughly.
- Do not immerse LED headlight in water or any liquid, use hot or cold water, avoid using running water on or near the open slots located on the light unit. Doing so will void the warranty.
Disinfecting
- Clean the LED headlight before disinfecting. Ensure the disinfecting cloth is thoroughly wrung out to remove excess moisture. After disinfecting, make sure the LED headlight is completely dried. For an up to date list of recommended products, visit www.surgitel.com/help.
- Do not use sprays on or near open slots located on the light unit. Do not immerse the LED headlight in any liquid. Do not use any disinfectants containing alcohol, hydrogen peroxide, ethanol, ammonia, glutaraldehyde, iodophors, bleach, acid, phenol, or acetone that have not been approved for use by SurgiTel. Do not use an autoclave. Doing so will void the warranty.
Professional Loupe and LED Headlight Tune Up with Detailed Cleaning
To keep your loupes and LED headlight working like new, we recommend a tune up at least once a year. This will ensure that your loupes are kept in great condition. To learn more about the U.S. and Canada Tune Up Program, visit www.surgitel.com/loupe-tune-up. For International customers, please contact your distributor for details.
Troubleshooting
Control pack does not turn on.
- Press and hold the up button for a minimum of 3 seconds.
- Battery voltage may be low or at zero volts.
Charge unit with the supplied 5V 4A USB-C charger for a minimum of 3 hours. - Remove and reinstall the existing internal battery cell.
- If the usage time remains significantly reduced after charging or the battery has been unused for over 6 months in a discharged state, we recommend replacing the battery cell with a new one.
Control pack does not charge.
- Push the USB-C type charging connector in all of the way.
- Check to make sure the port and connector are clean and free of debris.
- Test the charging unit on a secondary VAL control pack to confirm it is functioning properly.
- If the battery cell does not charge or hold a charge, purchase a new battery cell.
LED does not illuminate, battery pack indicator lights are on.
- Unplug the light cord, inspect for damage, and reinsert the light cord into the battery control unit and LED. Test with a second cord to confirm that the cord is not faulty.
- Power down the unit, remove and reinstall the existing internal battery cell.
LED light beam is flickering.
- Unplug the light cord, inspect for damage, and reinsert the light cord into the battery control unit and LED. Test with a second cord to confirm that the cord is not faulty.
- Excessive plugging, pulling, or shaking of the connector while the power is on can damage the LED control integrated circuit. The control unit (Figure 7) should be sent in to be repaired or a new control unit may be purchased.
Voice command no longer functioning.
- Confirm that the microphone is not disabled by either powering it off and back on or press the down button for more than 2 seconds.
- Open the unit and make sure no damage, including water damage, has occurred inside the unit.
- Remove and reinstall the existing internal battery cell.
LED light beam is not centered in magnified area.
- Check that the dove tail adapter is seated correctly.
- See the Hinge Tension section to learn how to tighten the hinge tension.
LED light hinge is loose.
- Check if any foreign substances have penetrated inside the hinge. Remove the foreign substances and clean the hinge.
- See the Hinge Tension section to learn how to tighten the hinge tension.
- If it is still loose, a new hinge may be purchased.
Light cord dislodges easily.
- Make sure the cable ends are shaped correctly, and confirm there is no debris in the connector port or cable. Check that the cable fully sits inside the port.
- Test the unit with a second LED cable; the current cable may need replacement.
Warnings
- Improper use of the batteries can cause them to overheat, explode, or catch fire, leading to serious injury. To prevent this, make sure to follow these safety warnings carefully:
- Do not modify control pack or power adapter.
- Protect from fluids or humid environments.
- Do not short circuit electrical contact.
- Do not bring device near severe heat source.
- Do not spray liquid or submerse in any liquid.
- Stop using device, disconnect charger, and contact customer service or your authorized SurgiTel distributor if device becomes excessively hot or emits an odor.
- Lithium-Ion Battery
- Only use SurgiTel batteries.
- Do not leave batteries unused for extended periods of time.
- Do not leave battery completely drained to prevent battery from going dormant. This may cause the battery to be unable to charge and will reduce the charge capacity. It is ideal to keep battery above 50% charge.
- Rechargeable lithium-ion batteries have a limited lifespan and will slowly lose their capacity to hold a charge, decreasing the runtime of powered devices.
- If you notice that you’re charging the battery more frequently or that your device isn’t running as long as it should, please contact our customer service or your authorized SurgiTel distributor to purchase replacement batteries.
Disposal Instructions
![]() This device contains lithium-ion cells. Please recycle or dispose of the batteries in accordance with national, state, and local regulations or return it to SurgiTel for recycling. The European Union Waste Electrical and Electronic Equipment (WEEE) directive prohibits disposing of electrical and electronic equipment as unsorted municipal waste. Instead, it must be collected and recycled or disposed of separately. Electrical and electronic equipment contain hazardous substances that pose potential risks to human health and the environment if disposed of in municipal landfills not designed to prevent the migration of these substances into the soil and groundwater. If you need assistance with disposal, please contact customer support or your authorized SurgiTel distributor.
This device contains lithium-ion cells. Please recycle or dispose of the batteries in accordance with national, state, and local regulations or return it to SurgiTel for recycling. The European Union Waste Electrical and Electronic Equipment (WEEE) directive prohibits disposing of electrical and electronic equipment as unsorted municipal waste. Instead, it must be collected and recycled or disposed of separately. Electrical and electronic equipment contain hazardous substances that pose potential risks to human health and the environment if disposed of in municipal landfills not designed to prevent the migration of these substances into the soil and groundwater. If you need assistance with disposal, please contact customer support or your authorized SurgiTel distributor.

